
by admin | Jan 2, 2024 | Build a wordpress website
Unleash Your Creativity with Divi: The Ultimate Theme Builder Review 2024
by admin | Jul 9, 2023 | Build a wordpress website
Managing your website efficiently is crucial for maintaining a successful online presence. WordPress offers a range of powerful tools and features to help you effectively manage your site, from updating content to optimizing it for search engines, and handling comments and feedback. In this blog post, we’ll explore key practices for managing your site in WordPress.
- Updating Your Content: Regularly updating your website’s content keeps it fresh and engaging for visitors. Follow these steps to update your content:
- Log in to your WordPress dashboard.
- Navigate to the “Pages” or “Posts” section, depending on where the content is located.
- Locate the specific page or post you want to update and click on it to edit.
- Make the necessary changes to the text, images, or other media elements.
- Review your updates and click on “Update” to save the changes and make them live on your site.
- Optimizing Your Site for Search Engines: Search engine optimization (SEO) helps improve your site’s visibility and organic search rankings. Follow these tips to optimize your WordPress site:
- Install an SEO plugin like Yoast SEO or All in One SEO Pack to assist you in optimizing your content.
- Optimize your page titles, meta descriptions, and URLs with relevant keywords.
- Ensure your content includes headings, subheadings, and keyword-rich text.
- Add alt text to your images for better accessibility and keyword optimization.
- Generate an XML sitemap and submit it to search engines using tools like Google Search Console.
- Handling Comments and Feedback: Engaging with your audience through comments and feedback fosters a sense of community and helps build relationships. Here’s how to manage comments and feedback effectively:
- Enable comments by going to the “Settings” > “Discussion” section in your WordPress dashboard.
- Regularly monitor and moderate comments to filter out spam and maintain a respectful environment.
- Reply to comments promptly to encourage conversation and show appreciation for reader engagement.
- Consider using anti-spam plugins like Akismet to minimize unwanted spam comments.
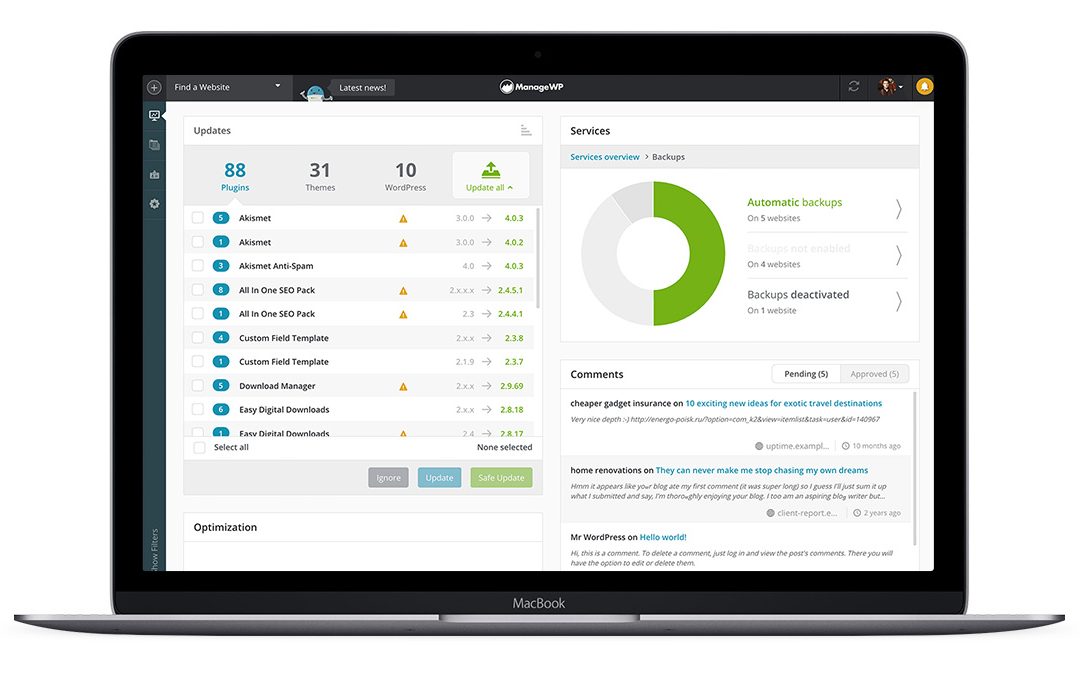
- Monitoring Site Performance and Security: Keeping a close eye on your site’s performance and security is vital. Follow these practices:
- Regularly update WordPress, themes, and plugins to ensure you have the latest security patches and features.
- Install a security plugin like Wordfence or Sucuri to monitor and protect your site from malware, brute-force attacks, and other threats.
- Utilize website monitoring tools to track site uptime, loading speed, and performance metrics.
- Back up your site regularly using plugins like UpdraftPlus or VaultPress to protect against data loss.
Conclusion: Managing your site effectively in WordPress involves regular content updates, optimizing for search engines, and handling comments and feedback. By following these practices, you can ensure your website remains fresh, visible to search engines, and engaging for your audience. Remember to stay proactive in monitoring site performance and security to maintain a safe and reliable online presence. With WordPress’s robust tools and features, you have everything you need to manage your site efficiently and effectively.

by admin | Jul 9, 2023 | Build a wordpress website
WordPress, being a versatile and user-friendly content management system, offers powerful tools for creating and managing both pages and posts. Understanding the differences between pages and posts and how to effectively utilize them is essential for building a successful website. In this blog, we’ll guide you through the process of creating pages and posts in WordPress.
Creating Pages: Pages in WordPress are static and typically serve as core content on your website. Follow these steps to create a page:
- Log in to your WordPress dashboard.
- Navigate to the “Pages” section on the left sidebar.
- Click on “Add New” to create a new page.
- Enter a title for your page in the designated field.
- Utilize the visual editor to add and format your content. You can insert text, images, videos, and other media elements.
- Use the formatting options to customize your content, such as headings, lists, and alignments.
- Once you’re satisfied with your page, click on “Publish” to make it live on your website.
Remember, you can create parent and child pages to organize your content hierarchically. Additionally, you can customize the page attributes such as templates and featured images in the right-hand sidebar.
Creating Posts: Posts in WordPress are dynamic and typically represent blog entries or time-sensitive content. Follow these steps to create a post:
- Log in to your WordPress dashboard.
- Navigate to the “Posts” section on the left sidebar.
- Click on “Add New” to create a new post.
- Enter a title for your post in the designated field.
- Use the visual editor to write your post content, just like with pages.
- Add relevant tags and assign categories to organize your posts.
- Choose a featured image that represents your post effectively.
- Once you’re ready, click on “Publish” to make your post live on your website.
WordPress also provides the option to schedule posts for future publication, making it convenient for planning and consistency in your content strategy. You can access this feature in the “Publish” settings.
Understanding the Differences: While both pages and posts allow you to create content, it’s important to grasp their distinctions:
- Pages: Ideal for creating static, evergreen content like About Us, Contact, or Services pages. Pages are not typically displayed in a chronological order and are often added to your site’s navigation menu.
- Posts: Best suited for dynamic content, news updates, or blog entries. Posts are displayed in reverse chronological order, allowing visitors to easily find and engage with your latest content. They can be categorized and tagged for better organization and navigation.
Conclusion: Creating pages and posts in WordPress is a straightforward process that enables you to build a comprehensive and engaging website. By understanding the differences between pages and posts and utilizing their unique features, you can effectively present your content to your audience. Whether you’re sharing timeless information or publishing timely blog posts, WordPress provides the flexibility and tools to bring your ideas to life.

by admin | Jul 9, 2023 | Build a wordpress website
WordPress plugins play a vital role in enhancing the functionality and features of your WordPress website. With thousands of options available, it can be overwhelming to choose the right ones. To help you out, here’s a short review of 10 essential WordPress plugins:
- Yoast SEO: Yoast SEO is a must-have plugin for optimizing your website for search engines. It provides a user-friendly interface to optimize your content, meta tags, XML sitemaps, and more. It helps improve your website’s visibility and organic search rankings.
- Akismet: Spam can be a major nuisance for any website. Akismet is a powerful anti-spam plugin that filters out spam comments and contact form submissions. It ensures a cleaner and more enjoyable experience for both you and your visitors.
- Jetpack: Jetpack offers a range of features to supercharge your website’s performance, security, and appearance. It provides functionalities like site backups, security scans, performance optimization, social sharing buttons, and more. It’s an all-in-one plugin for managing and enhancing your WordPress site.
- WooCommerce: If you’re planning to set up an online store, WooCommerce is the go-to plugin. It enables you to transform your website into a powerful e-commerce platform with features for product management, shopping cart functionality, payment gateways, and order tracking.
- Contact Form 7: Contact Form 7 is a flexible and user-friendly plugin for creating contact forms on your website. It allows you to design and manage multiple forms easily, customize fields, and handle form submissions efficiently. It’s a great tool for engaging with your audience and collecting inquiries.
- W3 Total Cache: Website speed is crucial for user experience and search engine rankings. W3 Total Cache helps optimize your site’s performance by caching pages, minifying CSS and JavaScript, and implementing browser caching. It significantly improves your website’s loading time.
- Wordfence Security: Keeping your website secure is paramount. Wordfence Security is a robust security plugin that protects your website from malware, hackers, and other threats. It offers features like malware scanning, firewall protection, login security, and real-time monitoring.
- UpdraftPlus: Regular backups are essential to safeguard your website’s data. UpdraftPlus simplifies the backup process by automating scheduled backups and allowing you to store them on cloud storage platforms like Google Drive, Dropbox, or Amazon S3. It provides peace of mind knowing that your website is backed up.
- WPForms: WPForms is a beginner-friendly drag-and-drop form builder plugin. It enables you to create beautiful and functional forms, including contact forms, registration forms, surveys, and more. It integrates seamlessly with popular email marketing services and offers a range of customization options.
- Google Analytics Dashboard for WP: Understanding your website’s traffic and user behavior is crucial for making informed decisions. This plugin integrates Google Analytics directly into your WordPress dashboard, providing easy access to your website’s performance metrics and insights.
These 10 essential WordPress plugins cover a wide range of functionalities, from SEO and security to e-commerce and form building. By utilizing these plugins, you can enhance your website’s capabilities and provide a better user experience for your visitors.
by admin | Jul 9, 2023 | Build a wordpress website
In the digital age, blogging has become a popular means of expressing ideas, sharing knowledge, and connecting with others. With numerous blogging platforms available, WordPress stands out as one of the most widely used and beginner-friendly options. If you’re looking to start your own blog, this guide will walk you through the process of starting a blog with WordPress.
Step 1: Choose a Domain and Hosting Provider
The first step is to choose a domain name, which will serve as the web address for your blog. Select a domain that reflects the essence of your blog’s content or your personal brand. Once you have a domain name in mind, sign up with a hosting provider that offers WordPress support. Popular hosting providers include Bluehost, SiteGround, and DreamHost.
Step 2: Install WordPress
Most hosting providers offer a one-click WordPress installation process. Simply log in to your hosting account, locate the “WordPress” or “Website” section, and follow the instructions to install WordPress on your domain. Once installed, you can access the WordPress dashboard.
Step 3: Configure Your Blog Settings
In the WordPress dashboard, navigate to the “Settings” tab. Here, you can customize various aspects of your blog, such as the blog title, tagline, and permalink structure. Take some time to explore these settings and adjust them according to your preferences.
Step 4: Choose a Theme
WordPress offers a wide range of themes that determine the appearance and layout of your blog. To choose a theme, navigate to the “Appearance” tab and select “Themes.” Browse through the available options and choose a theme that aligns with your blog’s style and objectives. You can always change your theme later if you wish.
Step 5: Install Essential Plugins
Plugins enhance the functionality of your WordPress blog. Some essential plugins to consider are Yoast SEO (for search engine optimization), Akismet (for spam protection), and Jetpack (for performance and security enhancements). Install these plugins by going to the “Plugins” tab and selecting “Add New.”
Step 6: Create and Publish Your First Blog Post
Now it’s time to start creating content! Navigate to the “Posts” tab and select “Add New.” Here, you can write your blog post using the intuitive WordPress editor. Add a compelling title, format your content, and insert images or videos if desired. Once you’re satisfied, click on the “Publish” button to make your post live.
Step 7: Customize and Organize Your Blog
To make your blog truly yours, you can customize its appearance further. In the WordPress dashboard, go to the “Customize” tab. Here, you can modify the colors, fonts, and other visual aspects of your blog. Additionally, you can create categories and tags to organize your blog posts and make it easier for readers to navigate.
Conclusion:
Starting a blog with WordPress is a straightforward process that can open up a world of opportunities for self-expression and connection. By following these steps, you’ll be well on your way to creating and sharing your unique content with the world. Remember to experiment, learn, and enjoy the journey of blogging as you grow your online presence.

by admin | Mar 4, 2022 | Build a wordpress website
A domain name is a unique name for your website such as ebizdesigns.com.au. It allows users to access the server where your website files are kept with an easy to remember title rather than a complicated ip address.
First, you need to choose the extension for your web address – such as .com.au or .net or .com. This is going to be a big part of your website and related services, so make sure you choose the one that matches your business profile. When you do a domain search, keep in mind that there are new options such as .net, .store and .tech.
If your business is in Australia, then you’ll want .com.au, since that’s the most popular local option. It helps brand your website and identifies your website as Australian. New options for a domain name search in Australia include .melbourne and .sydney and can clearly highlight your target audience.
Once you’ve chosen your extension, you can choose your domain name.
If your business is called Ebiz Designs and is located in Australia, then register the domain name ebizdesigns.com.au, ebizdesigns.com, ebizwebdesign.com.au or eb.com.au – the possibilities are endless.
Always keep in mind that this name should be short, direct, easy to remember and most importantly, related to what you do. This makes it easy to search for your domain and hard to forget it.


Recent Comments